

 Easter is just around the corner. Are you ready? If not, I’ve found some really awesome Easter designs…quick and easy…for you. More than likely, you probably already have some of the supplies laying around. Don’t leave things idle upcycle! Get the kids involved. They will love doing this one. Let’s get going on Easter!
You Will Need
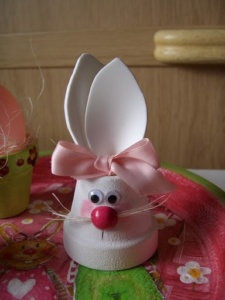
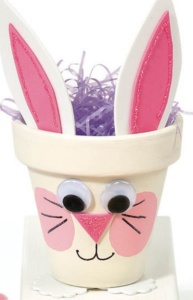
- Terra Cotta Pot – size depends on how big you want the bunny to be.
- Foam square white for ears.
- Ribbon – any bright springy ribbon that suits your fancy.
- Google eyes
- Round wooden knob for nose.
- White raffia for whiskers.
- White paint if you want a white rabbit or any color rabbit you desire paint accordingly.
- Pink paint for cheek blush.
- Red paint for nose.
- Black Paint for noseline.
- Glue gun
- Scissors
- Pencil
If you are upcycling, be sure your pot is free from all leftover debris using an mildly abbrasive scrubby. Allow to thoroughly dry. Paint with white paint. This may take several coats depending on the type of paints and color you are using.
While you are waiting for the paint to dry, cut two ears from the foam. You can prepare your bow as well and cut whiskers from the raffia. Get the nose painted and red to apply.
Once all your parts and pieces are ready, heat up the glue gun. Apply all the pieces as shown in the picture. Then carefully blush the cheeks. I wait until all the pieces are set so I know exactly where to place cheeks. The same goes for the noseline.
This link might be helpful should you want to create your own face for the bunny. Bunny Faces Be creative and make this masterpiece your own.
 Another idea is making a terra cotta pot into an easter basket. Proceed as above with th exception of placing the pot right side up. You will be using the same supply items just applying them differently. Add some colorful grass to the pot and you have a unique Easter basket. Stencil on the child’s name to personalize.
Take a small terra cotta pot and create this Bunny. Fill it with grass and a Cadbury for workmates, teacher, and friends and extended family.
Okay, lets really get the kids involved. They are going to love this one…Egg Carton Chicks! Too cute to pass up.
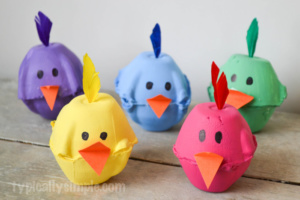
You Will Need
- Egg carton or cartons depending on how many chicks you want.
- Construction paper.
- Paints of different colors.
- Glue
- Scissor
Cut the egg carton apart into separate cup sections. You will need two pieces to complete one chick. Be sure the edges are smooth and straight. Now, glue the two pieces together to create the body of the chick. Paint each chick any color you want. Take the black paint and make two eyes. With the construction paper, cut a small diamond shape and fold in half. This will be the beak. Glue beak into place. Make another diamond shape, to match the color of the chick. Fold this piece the lengthwise. Using your scissors, carefully clip the piece to look like fringe. Use a toothpick to make a hole in the top of the chick’s head. The feather is to be stuck in the top of the chicks head for his.
The children can give these to family and friends wishing them a Happy Easter. Have them learn while they are young, there is nothing better than a handmade gift. I love handmade gifts, especially from the grandkids. Each season I get to see their creativity blossom.
“Live in the sunshine, swim the sea, drink the wild air.”
― Ralph Waldo Emerson
Embrace your creative nature. Encourage those around you to embrace their own creative nature. Share everything with one another.